Testing the functionality and usability of the application is a critical part of software development. There are many approaches to application testing methods, like unit testing, functional testing, end-to-end (E2E) testing, integration testing, performance testing, and more. Testing is usually conducted with a script and automation framework that can fish out bugs and inconsistencies throughout the application. Many teams rely on a tool called Appium for testing, which automates tests via its scripted solution. In this article, we’ll explore end-to-end testing and how to conduct it with Appium.
What is E2E testing?
End-to-end testing assesses the application’s functionality and integration with its environment from start to finish. The goal of this test is to simulate how the application behaves from the user’s end. You’re testing the user interface, functionalities, user experience, and how the features react in the user’s environment.
Expand Your Test Coverage
Why Appium?
Appium is a test automation framework for native, hybrid, and mobile web applications. It’s a cross-platform framework, which means that we can use a single API for iOS, Android, and Windows test suites. For many teams, it’s the right choice for automating your application’s E2E tests because:
- Appium offers the possibility of integrating continuous integration and continuous delivery (CI/CD) tools, making it possible to easily perform automations.
- If you’re building applications that combine elements of a native application and web application, Appium supports hybrid applications.
- Appium is a free and open-source software (OSS), which makes it great for teams working on a budget.
Setting up Appium: A tutorial
In this tutorial, we’ll be exploring Appium testing on web applications. First, let’s walk through installing and setting up Appium in our local environment.
Prerequisites for installing Appium
- An integrated development environment (IDE): VSCode, Eclipse, etc.
- Node.js and npm version 12 or later
- Homebrew
Installing Appium with NPM or homebrew
You can install Appium via your command line interface using npm or Homebrew. To install with npm, run the command below in your terminal:
npm install -g appium
If you’d like to install Appium through Homebrew, run the command below in your terminal:
brew install appium
Installing Appium through the graphic user interface
This method involves the installation of Appium desktop. To install Appium’s GUI, download the desktop version of choice from the official page.
End-to-end testing with Appium: Tutorial
After installing Appium, run the command below to start Appium and confirm that installation was successful:
appium
This command will show a welcome message, as well as the port Appium is running on. If you want to automate testing for a specific device, you’ll also have to install a driver for your specific setup.
For this tutorial, we’ll be testing the login flow of an iOS web application using Appium. In a login flow, we have to ensure that:
- the user can’t submit incomplete information; that is, they must complete required fields
- incorrect characters or inputs in a field will trigger a warning
- the password and username are strong enough
- the process submits the password and username if correct and in the right format, then redirects to the appropriate page
In order to achieve this, we’ll write a test to retrieve the ID of the username and password element, as well as the input from the user. Then, we’ll set up checks for login using React state.
Get element by accessibility ID
Now, we’ll use the Expo CLI to build and run our React Native application. This tool will allow us run our application in an emulator of our choice.
npm install --global expo-cli
Since we have Expo in our local environment, we can generate our application’s base by running the command below and answering the boilerplate questions accordingly:
expo init appiumtest
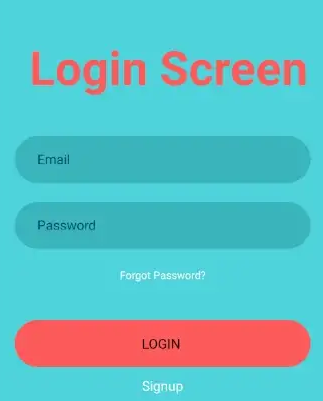
Next, we’ll add the code for our login page, inspired by a free login template into App.js. We’ll be using React state for the user’s login details.
import React, { useState } from 'react';
import {
    StyleSheet,
    Text,
    View,
    TextInput,
    TouchableOpacity,
} from 'react-native';
const App = () => {
    const onPressLogin = () => {
        // Do something about login operation
    };
    const onPressForgotPassword = () => {
        // Do something about forgot password operation
    };
    const onPressSignUp = () => {
        // Do something about signup operation
    };
    const [state, setState] = useState({
        email: '',
        password: '',
    })
    return (
        <View style={styles.container}>
            <Text style={styles.title}> Login Screen</Text>
            <View style={styles.inputView}>
                <TextInput
                    style={styles.inputText}
                    placeholder="Email"
                    placeholderTextColor="#003f5c"
                    accessibilityLabel="userEmail"
                    onChangeText={text => setState({ email: text })} />
            </View>
            <View style={styles.inputView}>
                <TextInput
                    style={styles.inputText}
                    secureTextEntry
                    placeholder="Password"
                    placeholderTextColor="#003f5c"
                    accessibilityLabel="userPassword"
                    onChangeText={text => setState({ password: text })} />
            </View>
            <TouchableOpacity
                onPress={onPressForgotPassword}>
                <Text style={styles.forgotAndSignUpText}>Forgot Password?</Text>
            </TouchableOpacity>
            <TouchableOpacity
                onPress={onPressLogin}
                style={styles.loginBtn}>
                <Text style={styles.loginText}>LOGIN </Text>
            </TouchableOpacity>
            <TouchableOpacity
                onPress={onPressSignUp}>
                <Text style={styles.forgotAndSignUpText}>Signup</Text>
            </TouchableOpacity>
        </View>
    );
}
const styles = StyleSheet.create({
    container: {
        flex: 1,
        backgroundColor: '#4FD3DA',
        alignItems: 'center',
        justifyContent: 'center',
    },
    title: {
        fontWeight: "bold",
        fontSize: 50,
        color: "#fb5b5a",
        marginBottom: 40,
    },
    inputView: {
        width: "80%",
        backgroundColor: "#3AB4BA",
        borderRadius: 25,
        height: 50,
        marginBottom: 20,
        justifyContent: "center",
        padding: 20
    },
    inputText: {
        height: 50,
        color: "white"
    },
    forgotAndSignUpText: {
        color: "white",
        fontSize: 11
    },
    loginBtn: {
        width: "80%",
        backgroundColor: "#fb5b5a",
        borderRadius: 25,
        height: 50,
        alignItems: "center",
        justifyContent: "center",
        marginTop: 40,
        marginBottom: 10
    },
});
export default App;
When you run:
expo start --iOS

//OR

npm run ios
You’ll need to choose the version you want your application to run on. You should see this login page on your screen.
Now, we’ll be installing webdriver as our web driver’s client.

npm install webdriverio
Now we’ll create our test file in the root of our folder. We’ll name this file index.js, and it’ll be the entry point of our application as shown in your package.json file. In this file, we’ll first initialize our webdriver client.
// initialise webdriver client
const wdio = require("webdriverio");
Next, we have to create a configurations file for our Appium server. Run this npx wdio config to generate the config file. You can also skip this step and add this code below to configure our application to use the iOS platform and iPhone 10 as the device name.
const PORT = 4723;

const opts = {
  path: '/wd/hub',
  capabilities: {
    platformName: "iOS",
    platformVersion: "12.2"
    deviceName: "iPhone 10",
    app: "path/to/your_application.apk",
    automationName: "XCUITest"
  }
};
Now we’ll write our test:
describe('Create Appium Test', function () {
    let driver;
    beforeEach(async function () {
      driver = wdio.remote('localhost', PORT);
    })
    it('should create to test Id', async function () {
        expect(await driver.hasElementByAccessibilityId('userEmail')).toBe(true);
        // find element
        findElement('userPassword', 'XCUIElementTypeApplication');
    })
})
After getting the email and password accessibility ID to be true, we can fetch the text from the user. To do this, we add the code below:
await driver.elementByAccessibilityId('userEmail').sendKeys('some_email')
await driver.elementByAccessibilityId('userPassword').sendKeys('some_password')
Start test
Since we already have Appium running, we can start our test by running the command below:
npm test appiumtest
At this point, we can add a Login and Logout state to test the successful login and logout of users.
Conclusion
It’s critical to test applications before shipping them to remove bugs and ensure user security. In this article, we have explored end-to-end testing with Appium and why it is useful, and worked through an example in an iOS emulator using React Native.
While Appium supports the testing of mobile applications, it isn’t for all users. For users looking for a solution requiring less coding experience, Tricentis Testim is one to consider. Beyond its no-code/low-code approach, Testim’s capabilites include advanced AI/ML locators, scalable TestOps, an AI-powered coding assistant, and more. Learn more about Testim.


