What Is Selendroid?
Selendroid, in short, is Selenium, but for Android. It’s a test automation framework powered by the Selenium client API that can drive the UI for native and hybrid Android applications. You can also use Selendroid to perform end-to-end tests on mobile web apps.
You can use Selendroid to test applications without altering the source code of the application under test, which many developers consider a key feature. Hence, you can test just about any application as long as you have the Android package kit (APK).
Selendroid vs. Appium
You can also use the Appium testing framework to test mobile applications. In this section, we’ll compare Selendroid and Appium side-by-side.
Expand Your Test Coverage
1. Installation
The initial setup process for Selendroid simply requires downloading the Selendroid standalone jar library and the dependencies for writing your test scripts. On the other hand, you can install Appium using the Node.js package manager (NPM). However, both may require you to set up the Android SDK as an additional dependency.
2. Supported Platforms
Selendroid supports the testing of native and hybrid Android applications, whereas Appium can run tests for Android, iOS, and Windows.
3. Architecture
Both Selendroid and Appium use a server-client architecture. However, you run Selendroid’s server from the terminal using Java. In contrast, the Appium server is a node application written in Javascript. Both tools have clients for multiple programming languages like Java, C#, Ruby, and Python.
How to Use Selendroid For End-to-End Testing
In this section, we’ll walk through how to perform automated end-to-end testing using Selendroid.
Step 1: Setup Development Environment
Before using Selendroid, you need to install all the necessary tools and dependencies. These tools include the Android SDK, which comes as part of the Android Developer Tools (ADT) bundle (includes the Eclipse IDE).
To get started, download the correct version of the ADT bundle for your operating system. As you may already know, after the release of Android Studio, Google ended official support for ADT in 2015 and as a result, you can no longer download it from the official landing page. However, you can find guides for how to get ADT for Windows and Linux below:
For Windows devices, you can download ADT from the following URL:
https://dl.google.com/android/ADT-23.0.6.zip
For Linux, run the following commands one after another to download and unpack ADT.
1. Navigate to the Downloads folder.
cd ~/Downloads/
2. Download ADT using Wget (make sure that you have Wget installed on your machine first).
wget http://dl.google.com/android/adt/22.6.2/adt-bundle-linux-x86_64-20140321.zip
3. Unpack ADT.
unzip adt-bundle-linux*.zip
Next, you’ll need to set up the $ANDROID_HOME path on your computer. Set the value for the path to point to the SDK folder in ADT. The step for doing this varies for Windows versus Linux.
For Windows, right-click on Computer (from the File Explorer) and navigate to Properties > Advanced System Settings. From the System Properties window, navigate to Advanced > Environment Variables.
In the Environment Variable window, click on New to add ANDROID_HOME as a new variable. Set the path to your Android SDK in Variable value. Once you’re done, edit the existing value for the Path system variable by adding the following code to the end of the line:
;%ANDROID_HOME%\tools;%ANDROID_HOME%\platform-tools
Exclude the semicolon at the beginning of the above code if the current value for Path already ends with one.
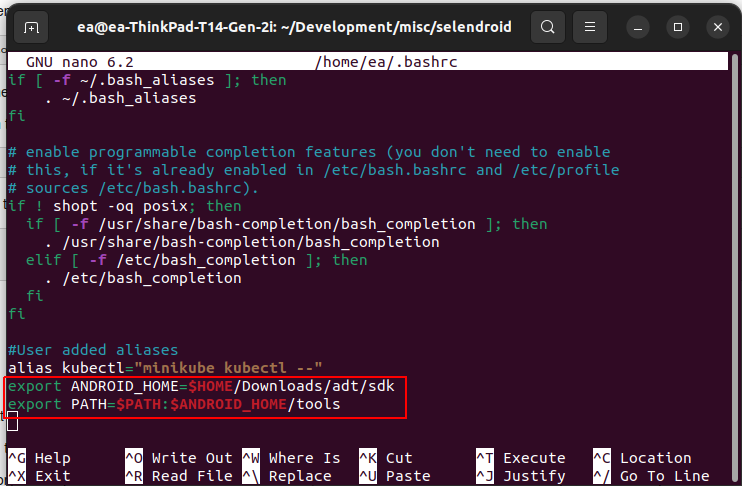
For Linux, you’ll need to modify the .bashrc file as follows. First, launch nano to open the file.
nano ~/.bashrc
Then add the following lines to the end of the file:
export ANDROID_HOME=$HOME/Downloads/adt/sdk
export PATH=$PATH:$ANDROID_HOME/tools
Press Ctrl+X to save the changes. With that, you can start setting up Selendroid.
The test we’ll be writing later in this post depends on the TestNG library. So let’s install that in Eclipse.
Launch the Eclipse executable from the ADT folder, then navigate to Help > Install New Software to launch the Install window. In the install window, click on the Add button, then enter the following details about TestNG:
Name: TestNG
Location: https://testng.org/testng-eclipse-update-site/7.4.0
Once you’re done, click Next and use the install wizard to finish the process.
Step 2: Download the Selendroid Tool
Selendroid offers a selendroid-standalone.jar file that you can run from the command line. You can obtain the latest copy of the selendroid-standalone.jar from the official site here.
Once you’ve downloaded the file, move it to the directory where you want to run the command. Also, note that you’ll store the APK file for the application under test (AUT) in this same location. To speed things up, you should also download the sample app we’ll use for testing here.
Step 3: Start the Selendroid Server
Next, open Command Prompt or Terminal and cd to the directory where you have selendroid-standalone.jar. After that, run the following command to start the Selendroid server:
java -jar selendroid-standalone-0.17.0-with-dependencies.jar -app selendroid-test-app-0.17.0.apk
Once you have the server up and running, you can view more information about your setup by visiting http://localhost:4444/wd/hub/status in a web browser.
Step 4: Write A Test
Now, let’s get to writing an actual end-to-end test with Selendroid. You’ll write the test inside the Eclipse IDE.
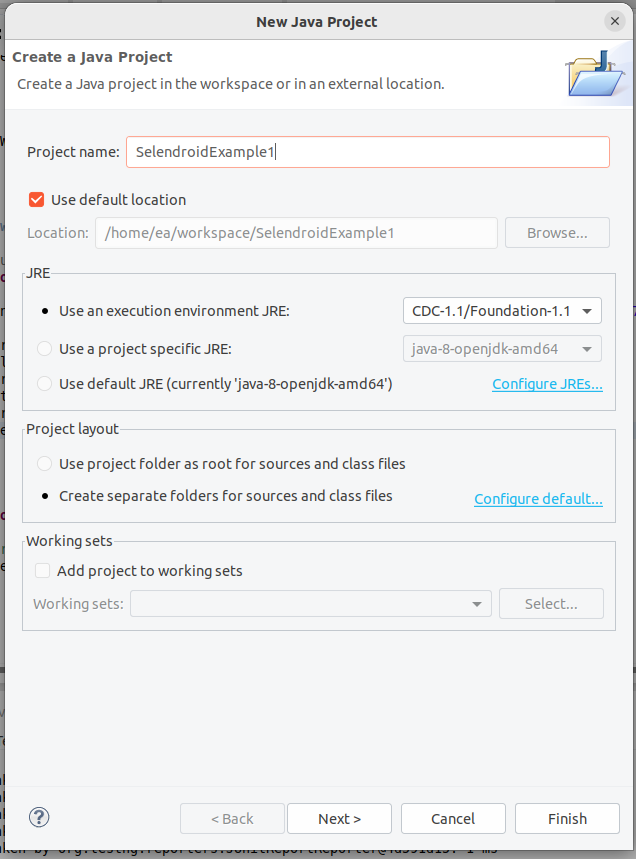
Before you write the test, open Eclipse and create a new Java project. Enter “SelendroidExample1” as the project name, then click the Finish button.

Next, right-click on the src folder for your new project and navigate to New > Class. Enter “AppTest” as the class name and click Finish.
Open the new class and add a new test method to it, using the following code:
@Test
public void firstTest() throws Exception {

}
You should notice red error underlining on the @Test annotation. Hover over it and select the Add TestNG Library option. Once again, hover over the error, and this time, select Import ‘Test’.
Now, to finish writing your test, add the following code inside the firstTest() method:
SelendroidCapabilities capa = new SelendroidCapabilities("io.selendroid.testapp:0.17.0");

WebDriver driver = new SelendroidDriver(capa);
WebElement inputField = driver.findElement(By.id("my_text_field"));
Assert.assertEquals("true", inputField.getAttribute("enabled"));
inputField.sendKeys("Hello world!");
Assert.assertEquals("Hello world!", inputField.getText());
driver.quit();
The code snippet above sets up SelendroidCapabilities using the appId for the application under test. Next, it initializes a new instance of WebDriver, and uses that instance to locate a text input field on the Selendroid test app we downloaded in step 2. It then performs an assertion that the input field is enabled so that Selendroid can type “Hello world!” in the field. There’s also an assertion to verify whether Selendroid entered the new next. Lastly, it closes the instance of WebDriver using the quit() method.
Note: Make sure you’ve imported all the necessary classes and methods for Selendroid and TestNG. You can download all the required Selendroid dependencies here.
Step 5: Run the Test
Before you run the test, make sure the Selendroid server is running (check step 3 for details on how to start the server) and connect your phone or start an Android virtual device (AVD, an emulator).
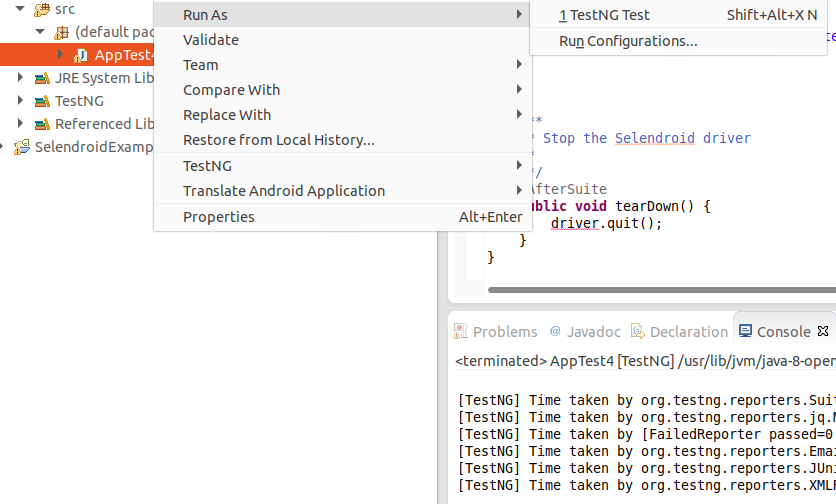
To run the test code from the last step, right-click on the test class and select Run As > TestNG Test. After that, wait for the project to build and the app should run on your phone, performing the actions specified in our test method.
Conclusion
To wrap up, let’s take a look at a quick recap of everything we covered in this post. In the post, you learned that Selendroid is a test automation framework for Android apps that can test native, hybrid, and mobile web apps. We also compared Selendroid to Appium, which is also a testing framework for mobile.
Next, we walked through a step-by-step guide that showed you how to perform an end-to-end test on an Android app using Selendroid and Eclipse.
Finally, it’s worth mentioning that using Selendroid requires some knowledge of Selenium, the tool on which Selendroid is based, and also knowledge of how to set up Android SDK and a debug device.


